The Gap Between "I Paid" and "I'm Booked"
A customer buys a class pack on your Shopify store, then stalls out, no obvious way to book, and a confusing password email from a company they've never heard of. Here's how to close that gap with Mindbody and ShopConnect.

Picture Cedar & Stone Pilates (a hypothetical studio, illustrative). A customer finds them online on a Tuesday night, lands on their Shopify store, and buys a 10-class pack. The sale goes through. Shopify says thank you. And then the customer just sits there, because nothing on the page tells them how to actually book a class.
A few minutes later it gets worse. They get a password-reset email from a company called “Mindbody” they have never heard of. To someone who just bought from Cedar & Stone, that email looks like spam. So they ignore it, and now they are a paying customer with no class booked and no idea what to do next.
That gap, the dead space between “I paid” and “I’m booked,” is the most common way fitness and wellness studios lose customers they have already won. This post is about closing it.
Where the handoff breaks
Most studios sell in one system and deliver service in another. Shopify is the storefront. Mindbody is the schedule. The customer does not know or care that there are two systems, they just want to pay and show up.
The breakage happens in the seam. Shopify takes the money and ends its part of the story at the confirmation page. Mindbody owns the booking, but the customer was never sent there, and the only signal Mindbody sends on its own, that password email, arrives with no context and the wrong sender name. Every customer who hits that seam is a support ticket waiting to happen, or worse, a quiet refund request.
For Cedar & Stone, even a modest stream of online sales means a handful of “I bought a pack, how do I book?” emails every week, plus the customers who never write in and never come back.
Put the schedule where the customer already is
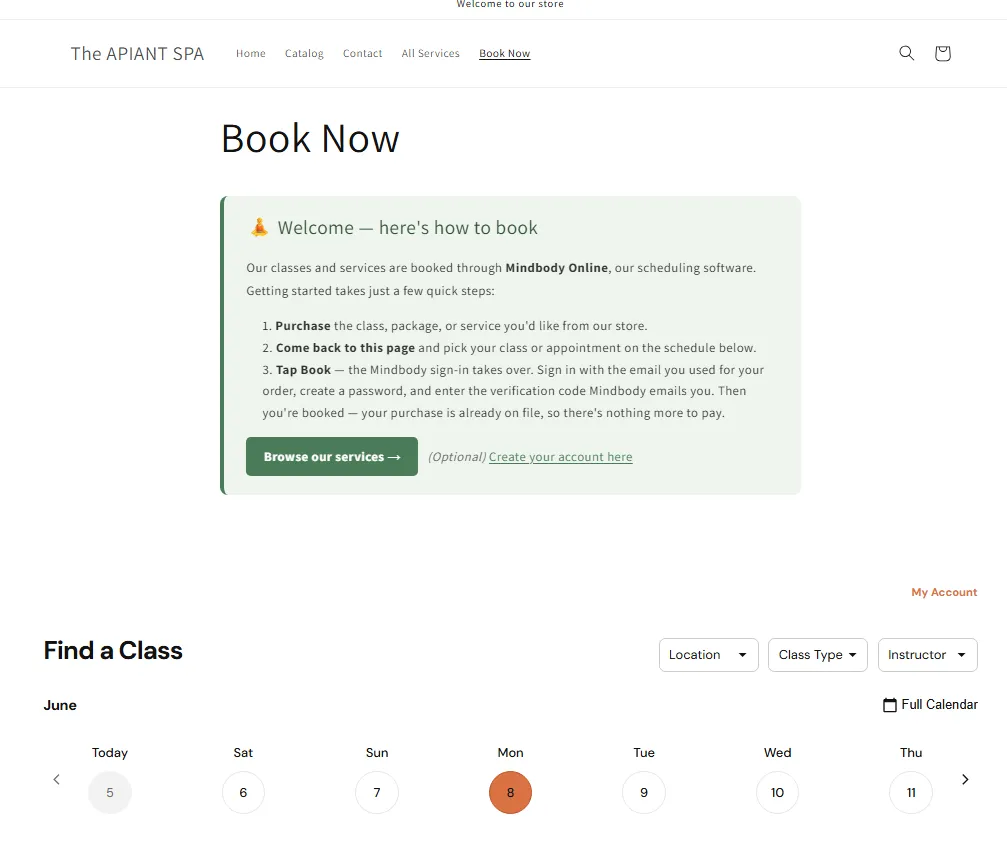
The first fix is to stop sending customers somewhere else to book. You can embed your live Mindbody schedule directly on your Shopify store as a “Book Now” page, so the customer books in a few clicks without ever leaving your site.
This is a Shopify page task, not a developer task. If you can add a page and edit your theme, you can do it. We keep the exact click-by-click current in the docs so it never drifts out of date: Add a Mindbody booking widget to Shopify. The widget shows your real schedule, updates itself, and lives on a page you control. If your site lives on Squarespace, Wix, or WordPress instead, the same widget embeds there too, and you point customers at that page instead.
One booking page, linked everywhere you say the word “Book.” Build it once.
When you can’t take payment through Mindbody
There is a wrinkle that catches a lot of studios outside the United States. In some regions, Mindbody’s merchant processing simply is not available, so you cannot take the payment through Mindbody at all. That is not a dead end. You can still sell services, packages, and memberships on Shopify and have them land correctly in Mindbody. The order just flips: buy first, book second.
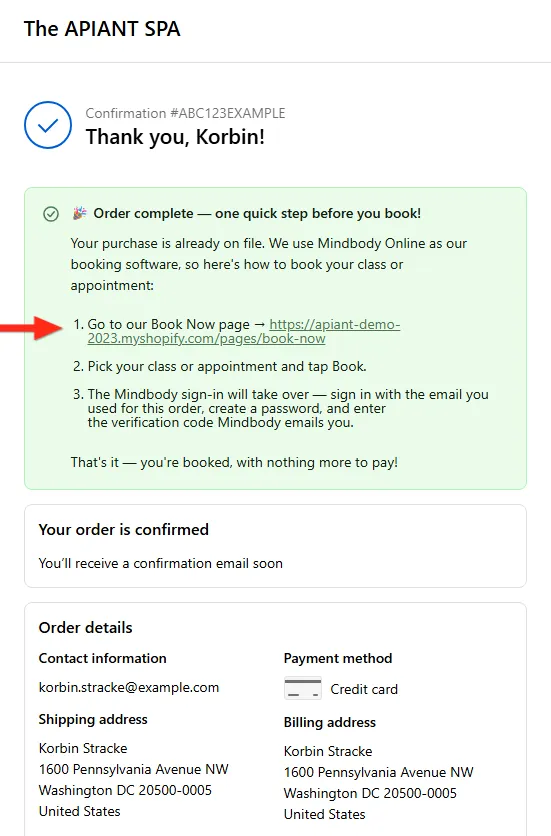
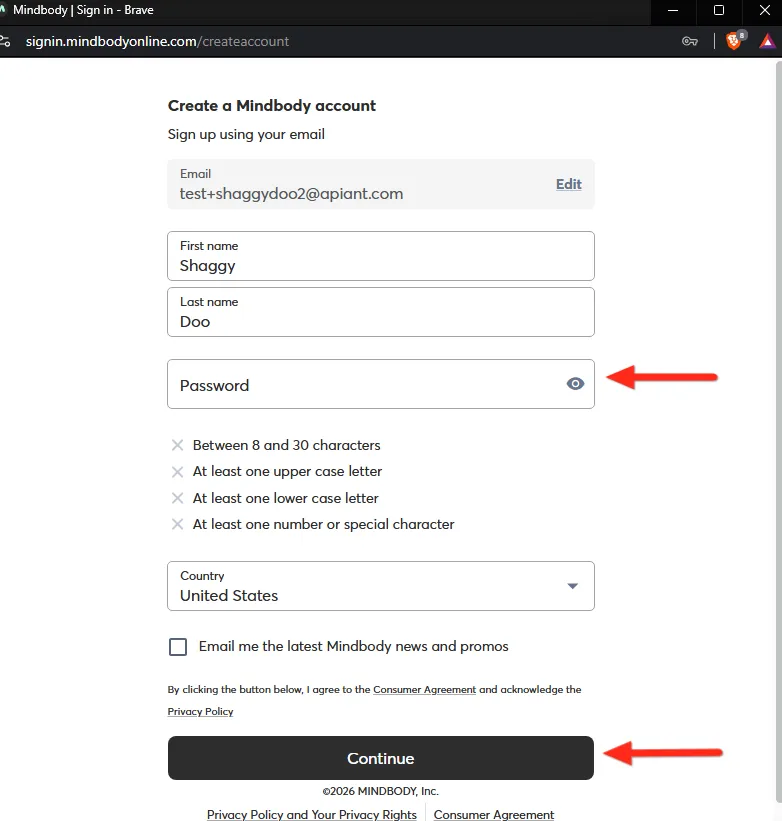
Here is the flow at Cedar & Stone. A customer buys a pack on Shopify. ShopConnect creates or matches their Mindbody client record and logs the purchase, so the credit is already sitting on their account before they book anything. Then the customer opens the Book Now page, picks a class, and taps Book. The Mindbody sign-in takes over right there: they sign in with the email they used for the order, create a password, and enter a verification code Mindbody sends them. No second trip back to your site, no separate email to chase.
The full setup, including the regions this applies to and how the buy-first flow is wired, lives here: Selling on Shopify without Mindbody payment processing.
Kill the confusing password email
Remember the spam-looking password email from the opening? That was the single sharpest edge in the old flow, and it has a clean fix.
Instead of letting Mindbody fire off a standalone password-reset email the moment a record is created, you turn that email off so Mindbody handles login inline, at the exact moment the customer taps Book. The password prompt now appears in context, as a natural step in booking, rather than as a mysterious message in their inbox an hour earlier. ShopConnect carries a setting for this, and the docs above walk through flipping it. One change, and the most confusing moment of the whole journey disappears.
What is left is almost nothing: tell the customer their purchase is already on file, point them at the Book Now page, and let them know it takes about thirty seconds. You can drop that same short message on the Shopify thank-you page and in the order confirmation email so it reaches everyone, the wording and placement are in the docs.
What ShopConnect is doing in the middle
The piece that makes all of this hold together is the matching in the middle. When a Shopify order comes through, ShopConnect has to decide which Mindbody client it belongs to, create the record if it is new, and post the purchase against the right account so the credit is genuinely there when the customer goes to book.
That sounds simple until you remember the two systems describe the same person differently. APIANT’s unified, format-agnostic data processing engine reconciles the Shopify order and the Mindbody client into one consistent picture, so the purchase always lands on the correct account without anyone re-keying it. You are not reconciling two systems by hand at the end of the week. The store and the schedule agree on who bought what, automatically.

What closing the gap is worth
These are illustrative composites for a studio like Cedar & Stone, not measured results from a real account:
- “I bought a pack, how do I book?” support emails: down sharply, because booking lives one tap from the purchase.
- Time spent reconciling Shopify orders against Mindbody accounts by hand: roughly 1 to 3 hours per week, reclaimed.
- Customers who pay but never book their first class: meaningfully lower, because the confusing password email is gone and the next step is obvious.
The improvement is mechanical, not magic. You removed a handoff, removed a surprise, and removed the manual matching in the middle. Each one was a place customers used to fall through.
Why this matters
A booking widget and one disabled email do not sound like much. But the moment between paying and booking is where studios quietly lose people they have already convinced to buy. A customer who cannot figure out how to book does not usually complain. They just do not show up, and a no-show on a fresh class pack is a customer who may never come back.
Put the schedule on your store, let Mindbody handle login at the right moment, and let ShopConnect keep the two systems honest about who bought what. Do that, and “I paid” and “I’m booked” become the same thirty seconds instead of two separate problems.
Takeaways
- The gap is the problem, not the tooling. Customers fall through the seam between buying on Shopify and booking in Mindbody. Close the seam and the support tickets go with it.
- Embed the schedule on your own store. A Book Now page with your live Mindbody widget means customers book a tap away from buying. Build it once, link to it everywhere.
- No Mindbody payment processing in your region? Buy first, book second. ShopConnect logs each Shopify purchase against the right Mindbody client, so the credit is ready before they book.
- Turn off the standalone password email. Let Mindbody prompt for a password inline at booking, in context, instead of mailing it out cold.
- Let the data engine do the matching. ShopConnect reconciles each order to the correct Mindbody account automatically, so you are not stitching two systems together by hand.
Running ShopConnect and want a hand getting your Shopify store and Mindbody talking to each other? Reach out to the APIANT team, we’re happy to walk through it with you.
Keep reading

Mindbody and HighLevel: One Clear Schedule Per Student Across Every Program
If your studio runs beginner programs, longer courses, and private lessons at once, here is how your reminders finally match what each student actually has booked.

Mindbody and Klaviyo: Per-Location Marketing for a 6-Gym Strength Network
A central marketing team sending one blast to every member of a 6-gym network gets the coach name and the gym address wrong half the time.

Live Fundraising Board Dashboards From DonorPerfect Data in HubSpot
Your board wants trend lines. Your staff want their evenings back. With donor value, average gift, and campaign performance flowing into HubSpot, the monthly board report stops being a four-day project and becomes a saved dashboard.